Constructing Art: Catching the Viewer’s Eye
These hands-on activities, inspired by works of art in the VMFA collections, will require your creative imagination and your ability to manipulate a variety of materials.
Introduction
There are many ways to create works of art. They can be painted on flat surfaces, woven in the form of tapestries, or carved from marble or wood. They can also be constructed to fulfill a purpose. Tables, chairs, and other types of furniture are objects that can be both useful and pleasing. These hands-on activities, inspired by works of art in the VMFA collections, will require your creative imagination and your ability to manipulate a variety of materials.
Note for Teachers: Scaffolding Opportunities!
To help your students build their understanding of shape and form, try selecting activities from the three sets of related VMFA resources described below. Each set of activities is scaffolded to move from simple to more complex activities. Pick and choose the best combination of lessons for your classroom.
- The Get into Shape gallery hunt and associated activities in Exploring Shape: Squares, Rectangles, Circles, and More focus on flat geometric and organic shapes.
- The Fold It, Bend It, Shape It gallery hunt and Fold It! activities leave “flat land” to investigate and make folded shapes.
- The Build It! gallery hunt and associated activities in Constructing Art: Catching the Viewer’s Eye (offered in this resource) examine 3-D structures and offer hands-on construction challenges.
Center Table
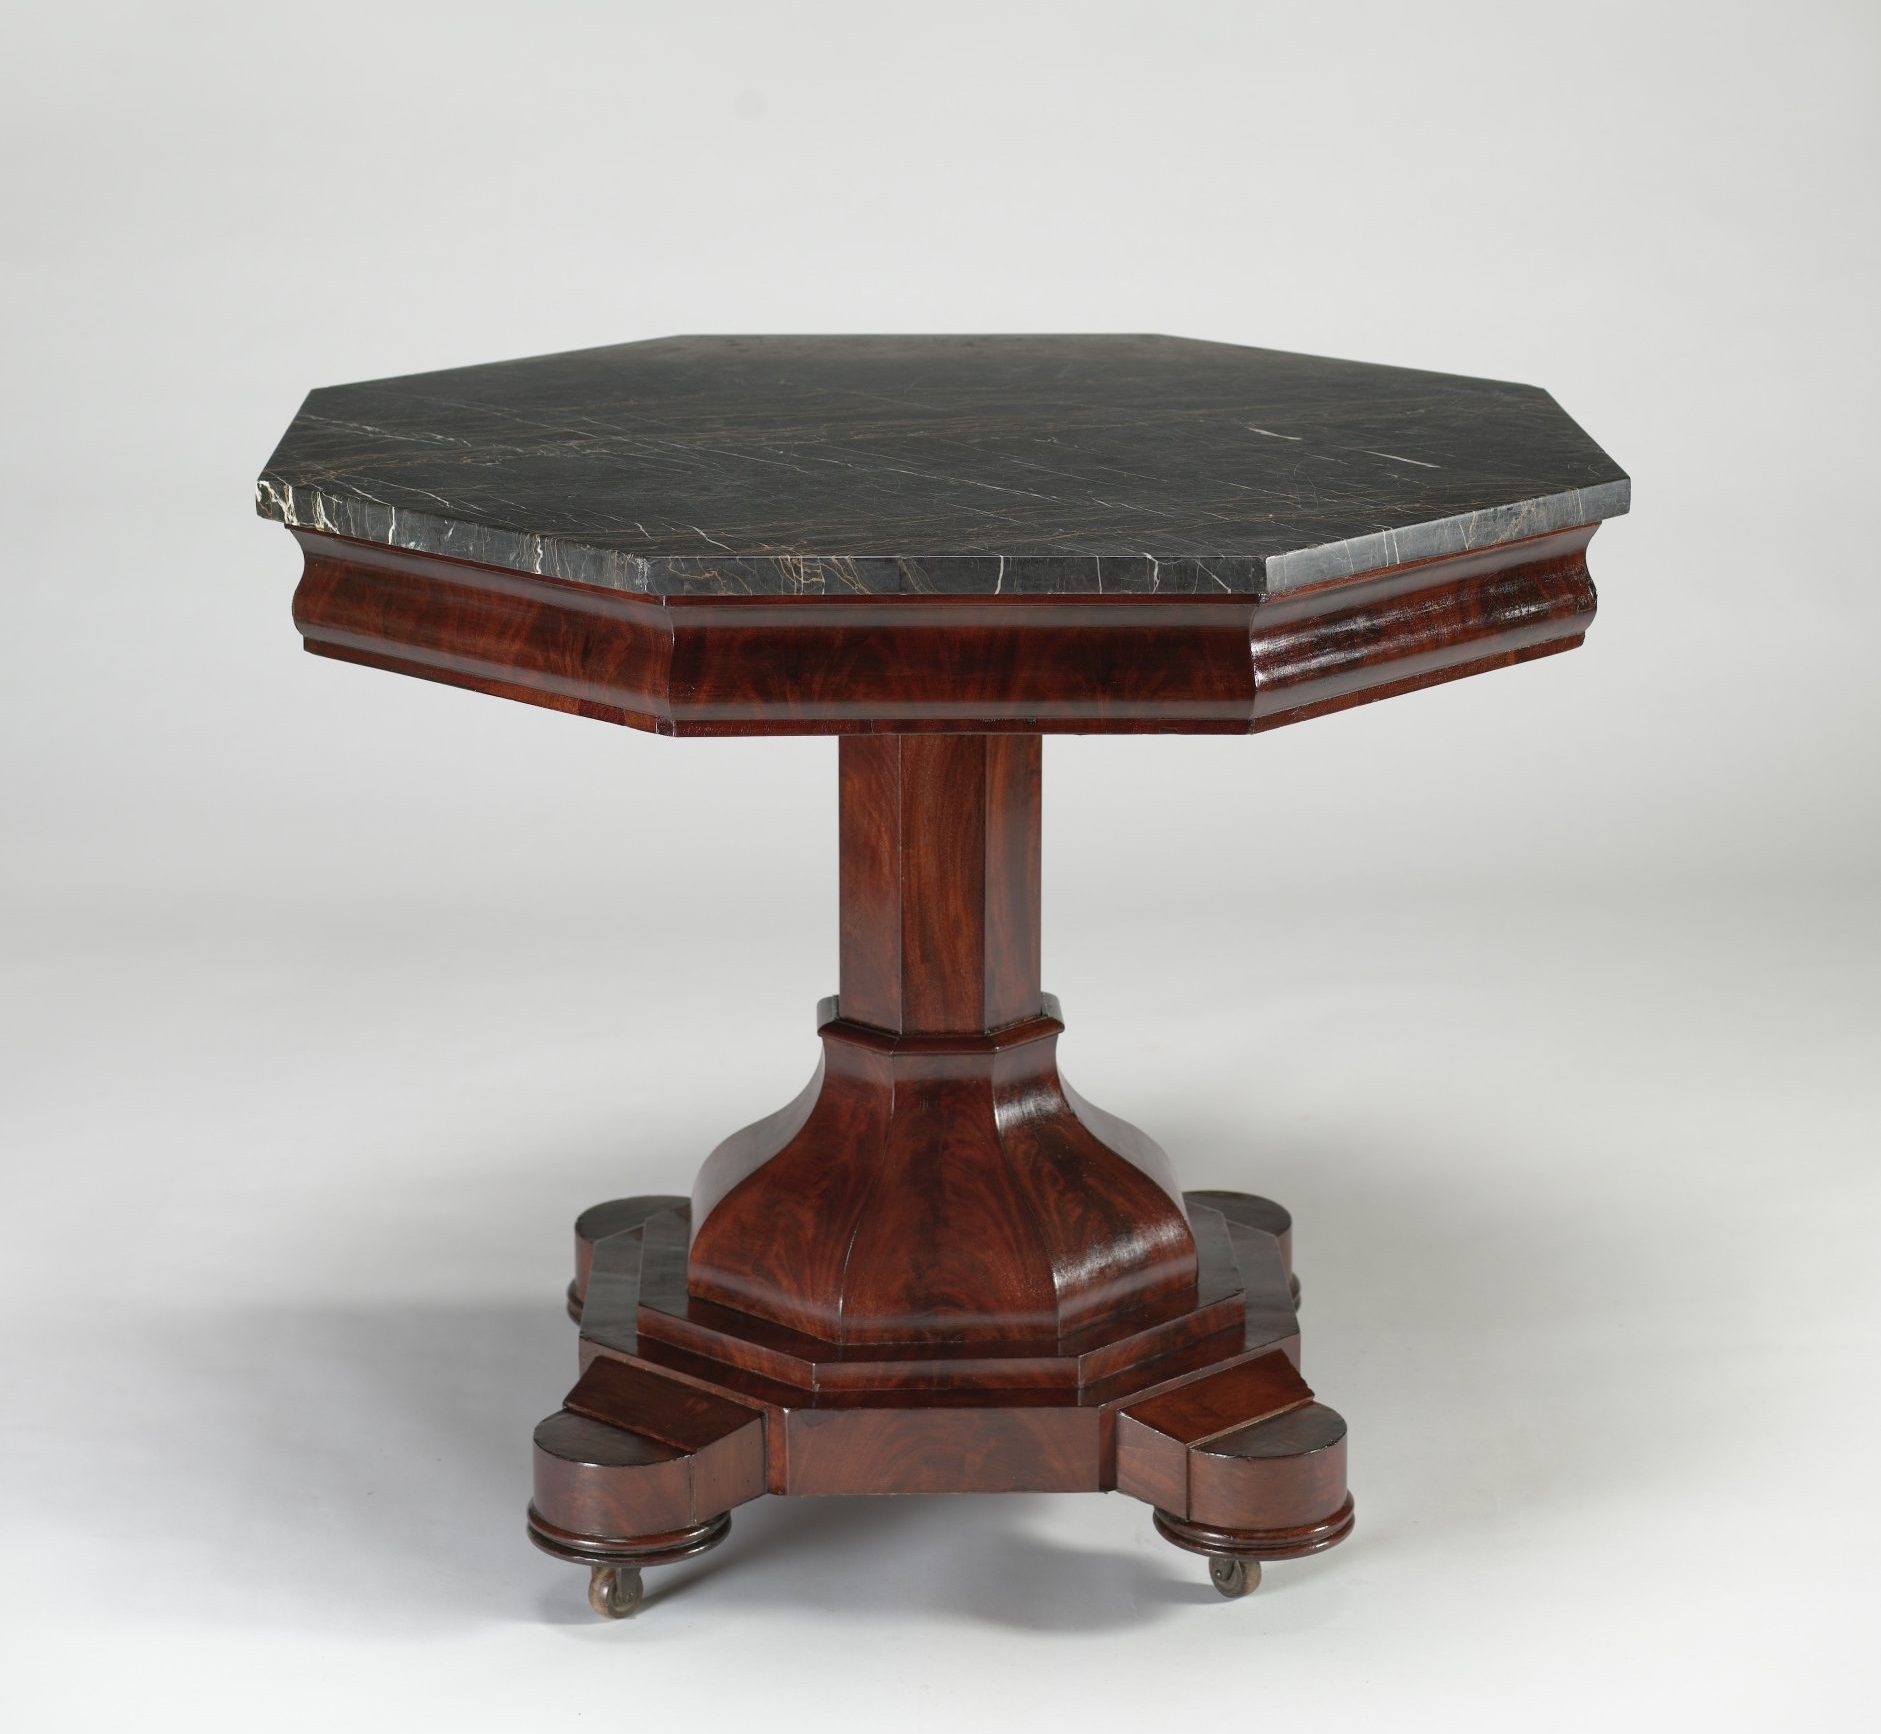
This octagonal Center Table is thought to be the work of Thomas Day, a celebrated African American cabinetmaker. He owned one of the most successful furniture manufactories in the South in the years before the Civil War. Day was born in 1801 in Dinwiddie, Virginia, to free African American parents. He was well educated, attending school with white students in Sussex County. After learning carpentry skills from his father, he moved to Milton, North Carolina. By 1850, his shop had become the state’s largest cabinetmaking firm. Day’s mostly white clientele included wealthy planters, businessmen, and politicians from several states.
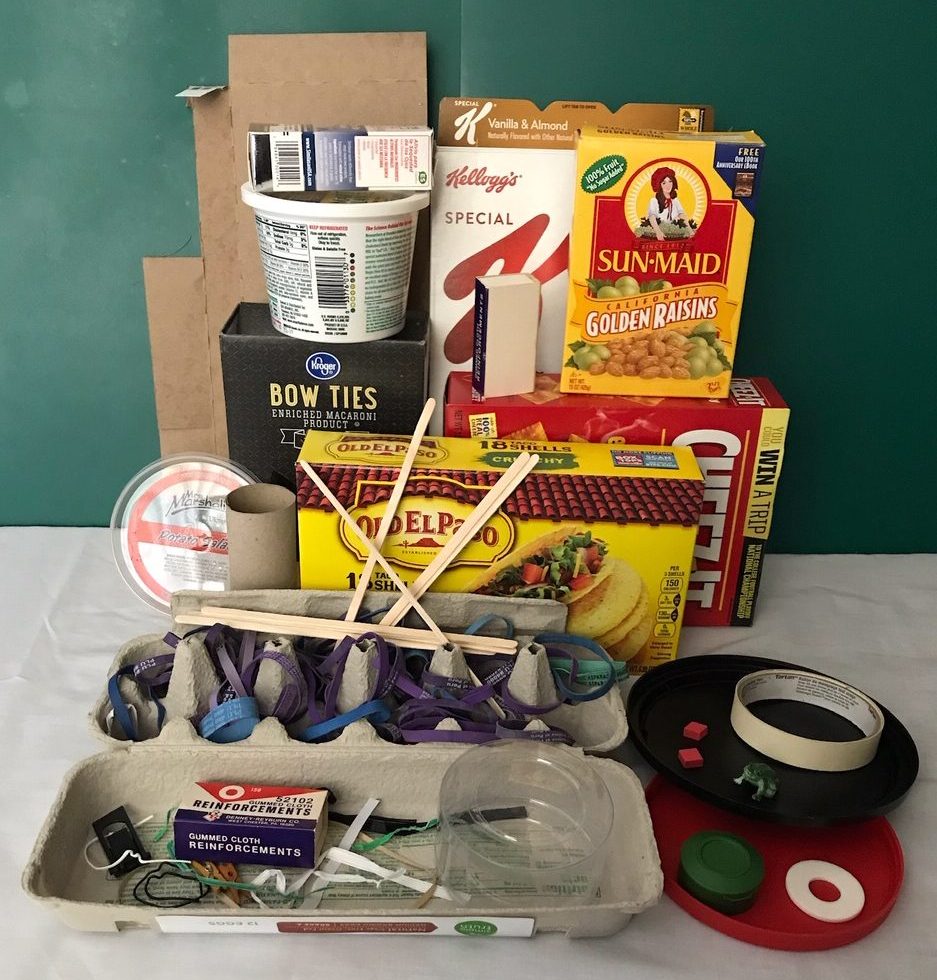
Make a Paper and Found-Object Table inspired by the Center Table!
You’ll need:
- an assortment of colored construction paper
- cardstock
- ruler
- pencil
- scissors
- glue sticks, bottled glue, tacky glue (optional)
- colored pencils, and/or assorted decorative materials
- an assortment of metal or plastic tops from containers—small sized paper plates will work as well.
- colored tape (optional)
- drawing compass (optional)
To make a table inspired by Thomas Day’s Center Table, begin by choosing some materials and colors. You’ll need round circles for the top, paper for the column, and a plastic or metal container top for the base. Part of the fun of this activity is finding inspiration from the materials you gather.
(Ask your parents or teacher to help you make sure that you find safe materials! Magazines, old holiday cards, stickers, etc. can offer lots of colors and textures.)
There is no wrong way to make your table. This activity is about solving construction challenges and investigating materials.
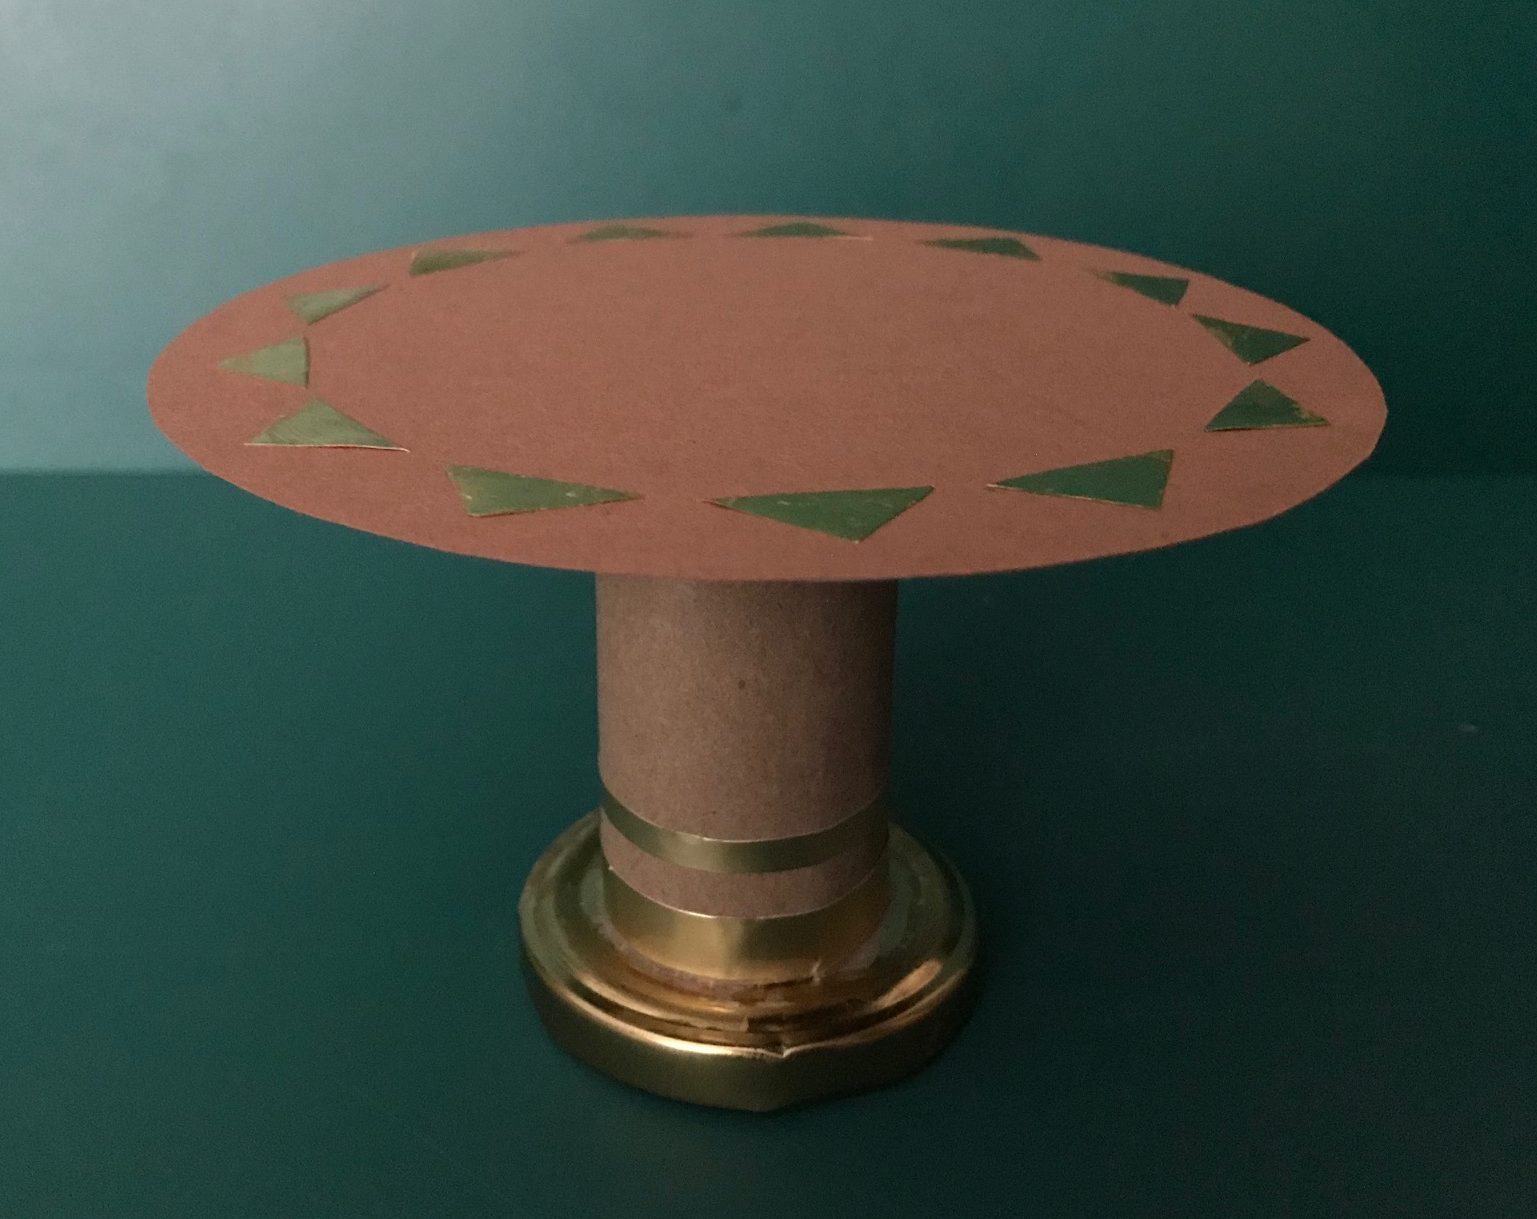
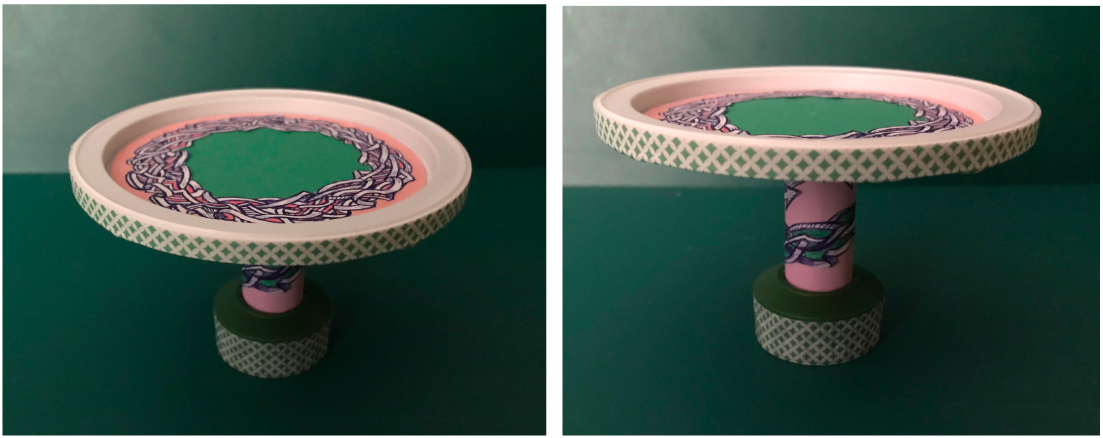
This example was made by using a plastic container lid as guide to draw two circles on brown construction paper. A third circle of the same size was drawn on a piece of cardstock.
The three pieces were glued together with a glue stick. The cardstock was sandwiched between the brown circles to make the top sturdier.
(A small paper plate also makes a great miniature table top.)
You might also use this as an opportunity to practice drawing circles with a drawing compass.
Decide how you would like the top of your miniature table to be decorated and draw, glue, or attach the decorations.
In this example, a gold-colored jar top was chosen as the base for the table, so gold decorations were chosen for the table top.
The little gold triangles were cut from scraps of gold ribbon. (Hint: Use extra strong glue sticks for metallic decorations.)
Set aside your table top to let the glue dry and decide what color you would like the central post to be.
Measure out a rectangular piece (about 2–3 inches in height and 5–6 inches in width).
Curl the paper strip into a column with a diameter that will fit nicely on top of the small container top that you’ve chosen for the base. Once the glue is dry, decorate the column in a way that goes well with the table top.
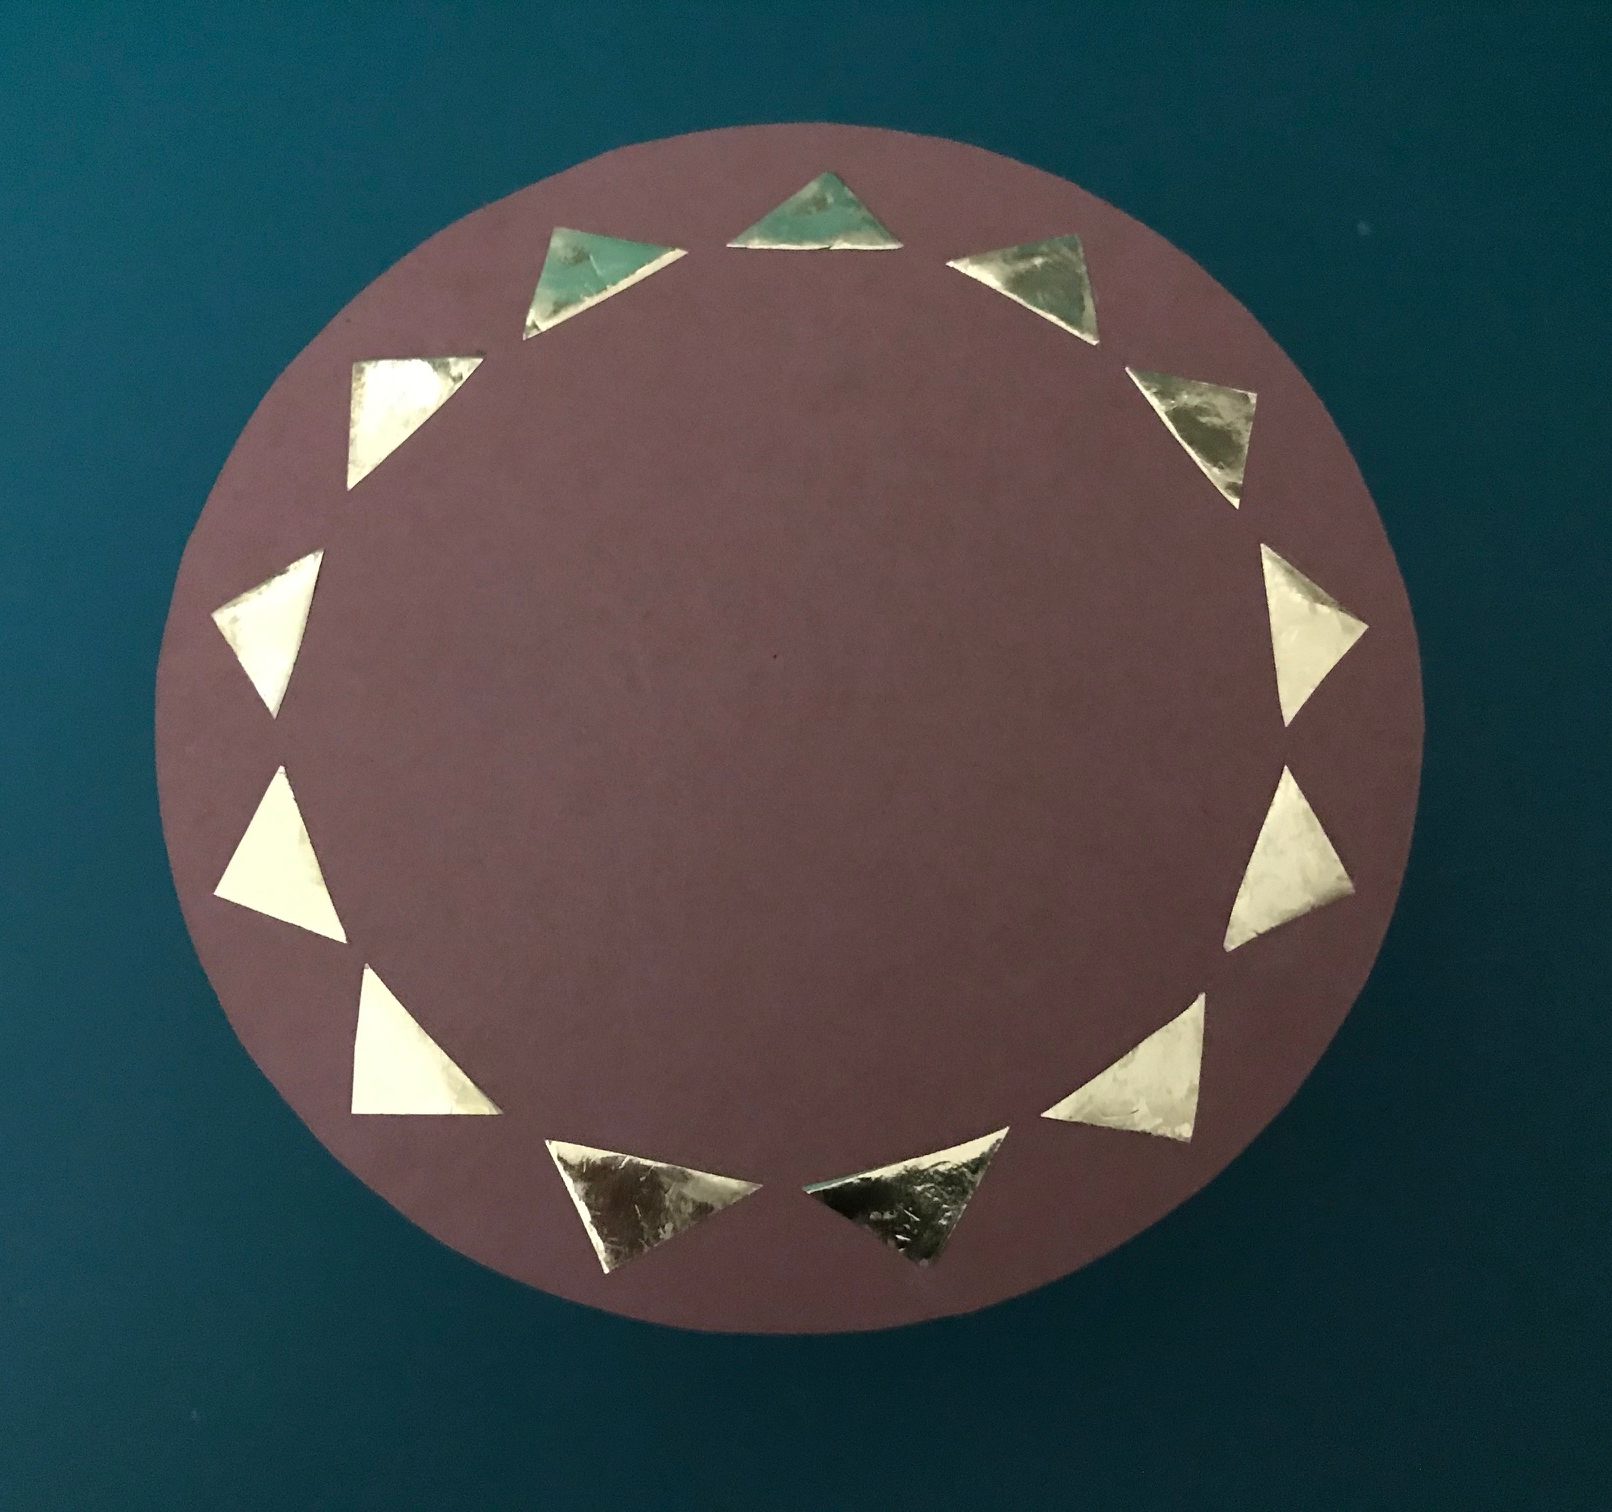
In the example shown above, a slightly lighter brown colored paper was chosen for the column.
Gold stripes, which were peeled from border of a sheet of gold holiday stickers, were added as decorations.
Glue the bottom of the column onto the base that you’ve chosen. You might need tacky glue if the container is metal. You may want to experiment with different glues depending on the materials you choose.
Finish your table by turning the tabletop upside down. Place the dry column upside down, carefully centered on the bottom of the table top and use a pencil or marker to trace the circumference of the column. Remove the column and squeeze a circle of glue on top of the circle you’ve just made. Place the column so that the top rim of the column is placed in your circle of glue. Let the glue dry.
Flip the table over and enjoy your own Miniature Center Table!
Here’s another example made from a white plastic container top, a green top from a bottle of dried spices, left-over washi decorative tape, and colored pencils. The decorations circling the column and on the top were taken from sketch-book doodles, with green and pink color added to go with the color scheme!
Your sketches, doodles, and drawing experiments are a great source of ideas.
Remember that it’s ok to have some design failures along the way! Just keep a record of what works and what doesn’t work to build up your understanding of materials!
For example, when the first attempt at a brown table top (pictured here) was made, it was attached to a clear plastic top with bottled glue.
Not only did the wet glue make the construction paper buckle, but the dry glue popped off of the clear plastic top!
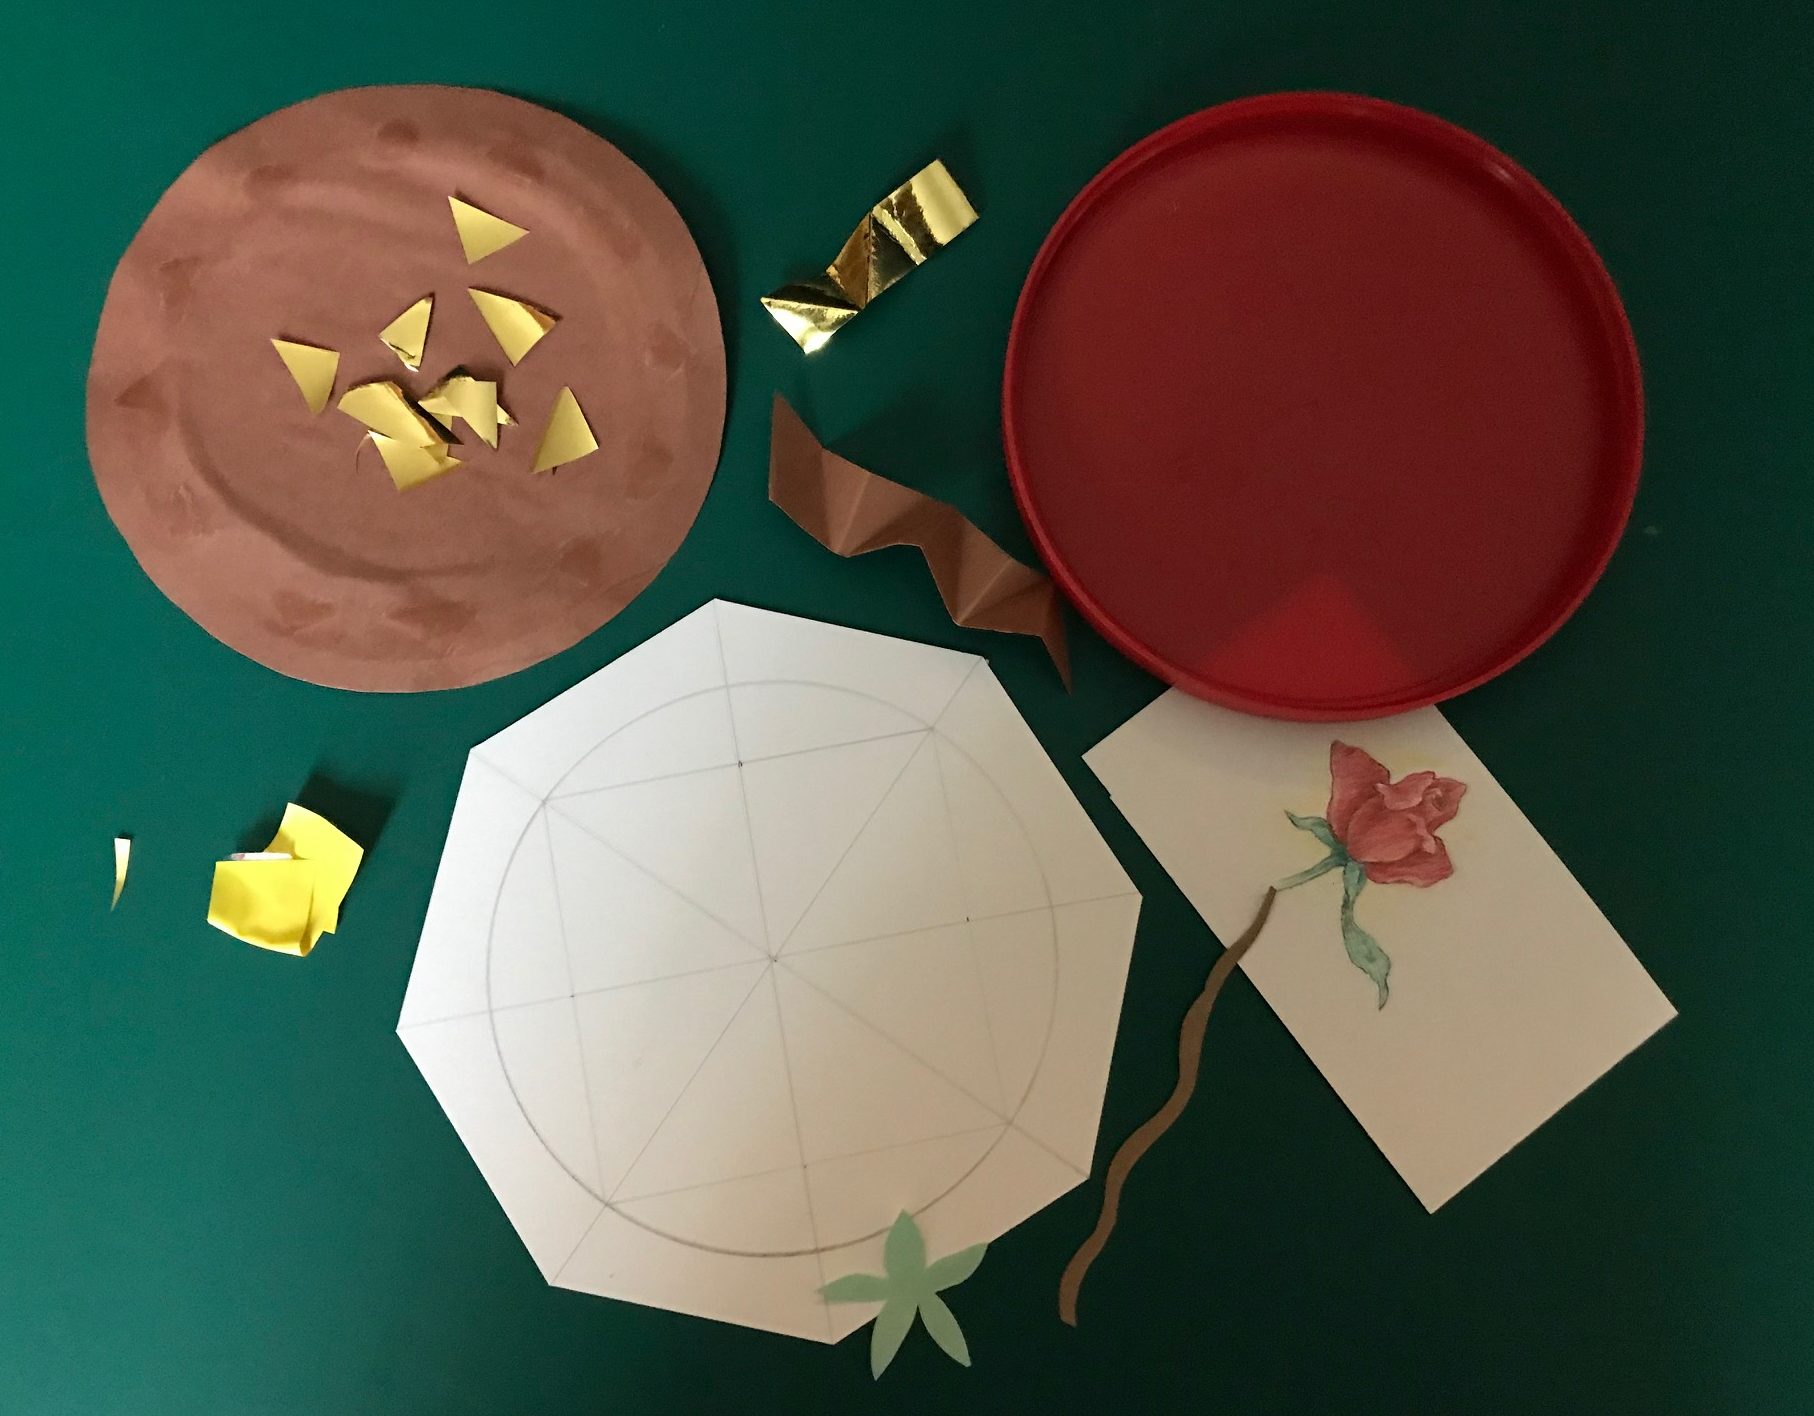
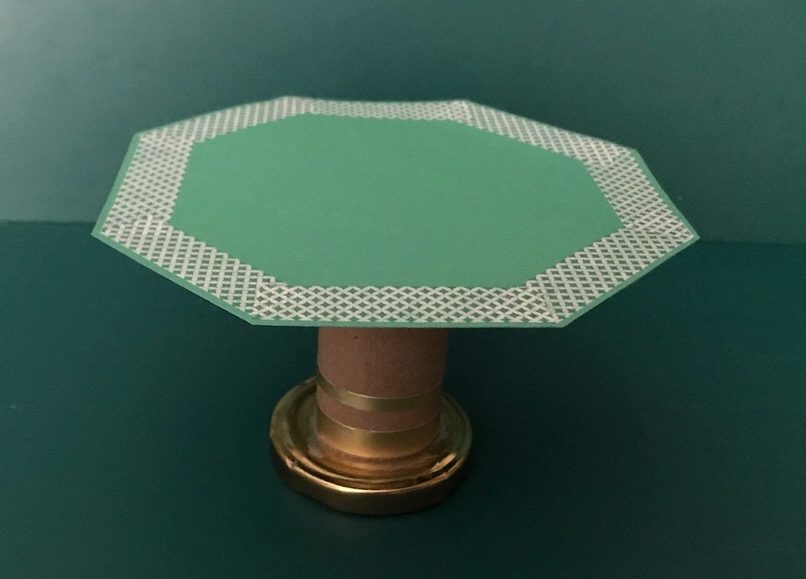
It’s also a good idea to keep the leftover elements that you decided not to use. An octagonal table top was originally planned as an alternate top for the first table, but the final design called for gold and brown.
The octagonal table top became a miniature floor rug in a later design challenge.
The Designer’s Eye
Have you ever thought of a chair as a work of art? How about a side table, a lamp, or a bed? These useful items are designed by artists and there are many examples in museum collections all over the world! The Virginia Museum of Fine Arts has a superb collection of decorative objects, including several suites of furniture. (The word suite is used to refer to a set of matched furniture.)
Pictured here are two suites of furniture from the VMFA’s Collection. How would you compare and contrast them?
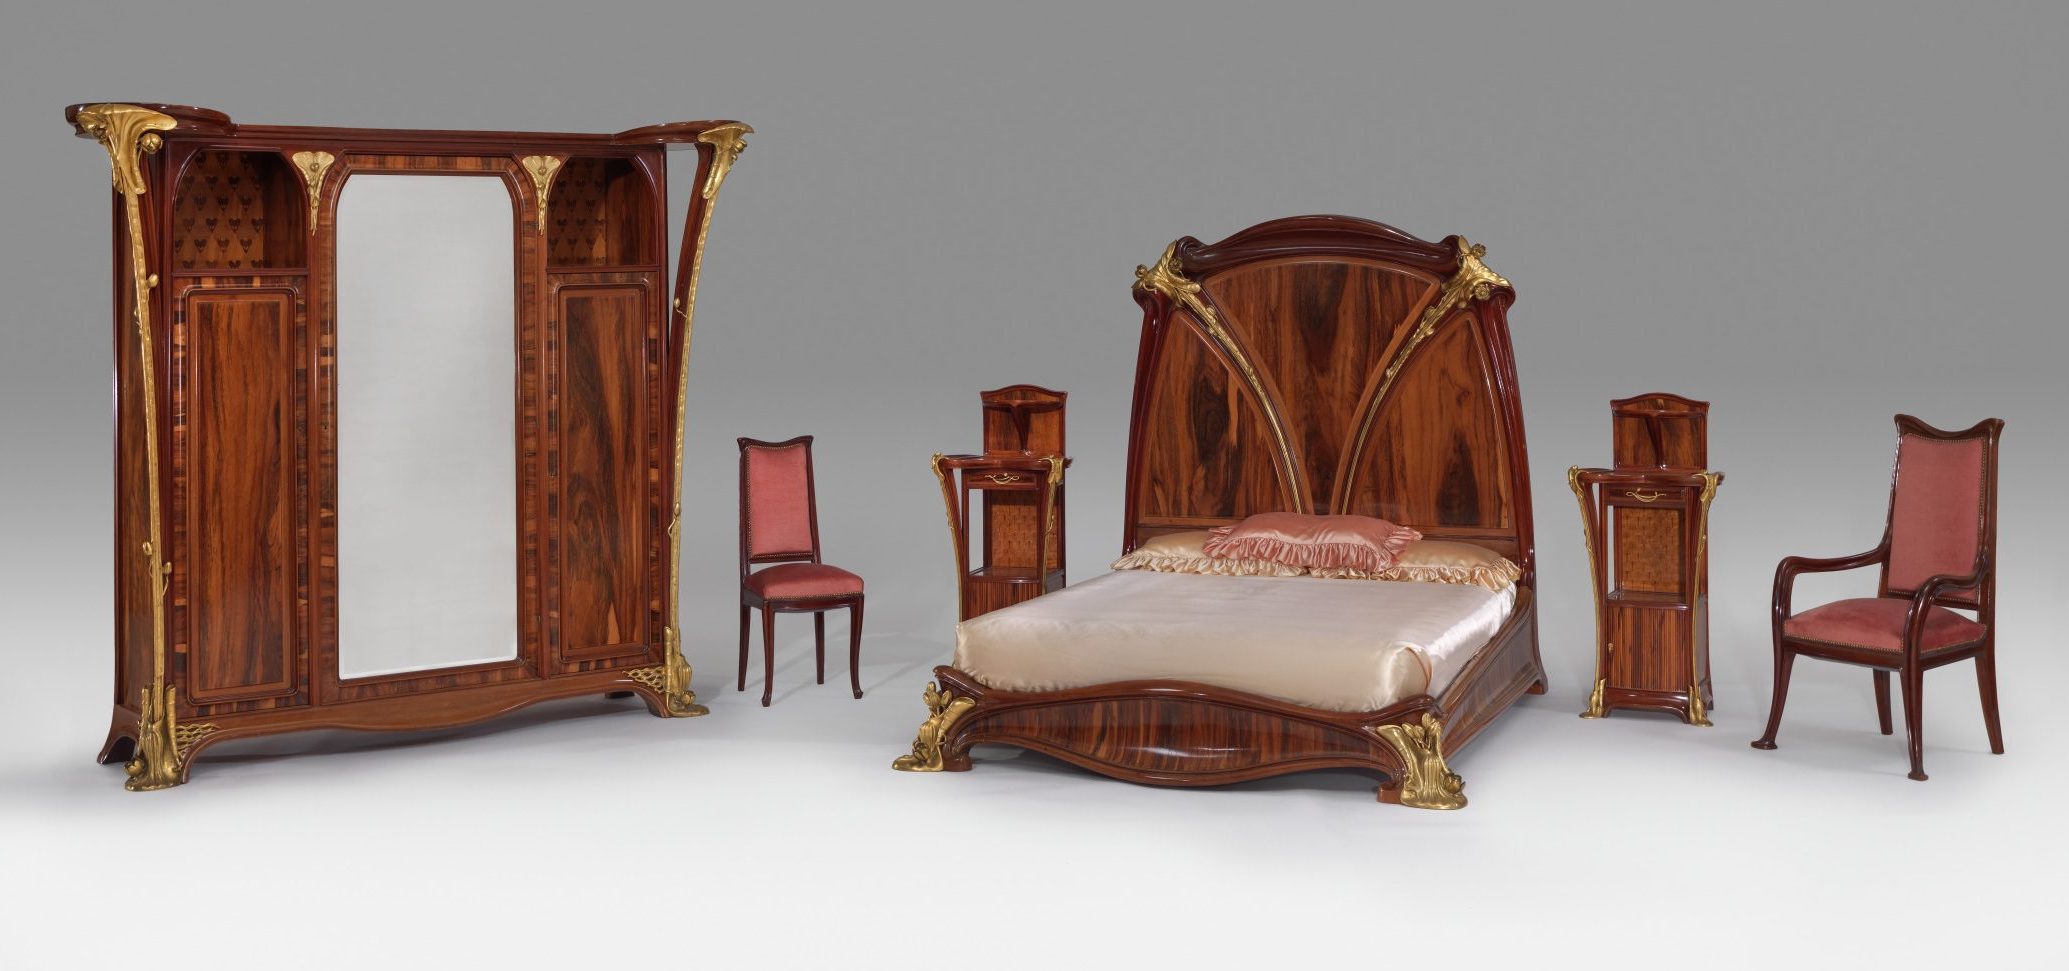
Louis Majorelle, French, 1859–1926. Bedroom Suite, ca. 1905-08, Mahogany, rosewood, marquetry of woods, bronze, gilding, upholstery, Gift of Sydney and Frances Lewis, 85.90.1-8
This bedroom suite (above) was designed by a French artist named Louis Majorelle. He was greatly influenced by an art movement known as Art Nouveau, which means “new art” in French. Art Nouveau designers liked curves and organic shapes. Can you see that the gilded decorations resemble water lilies?
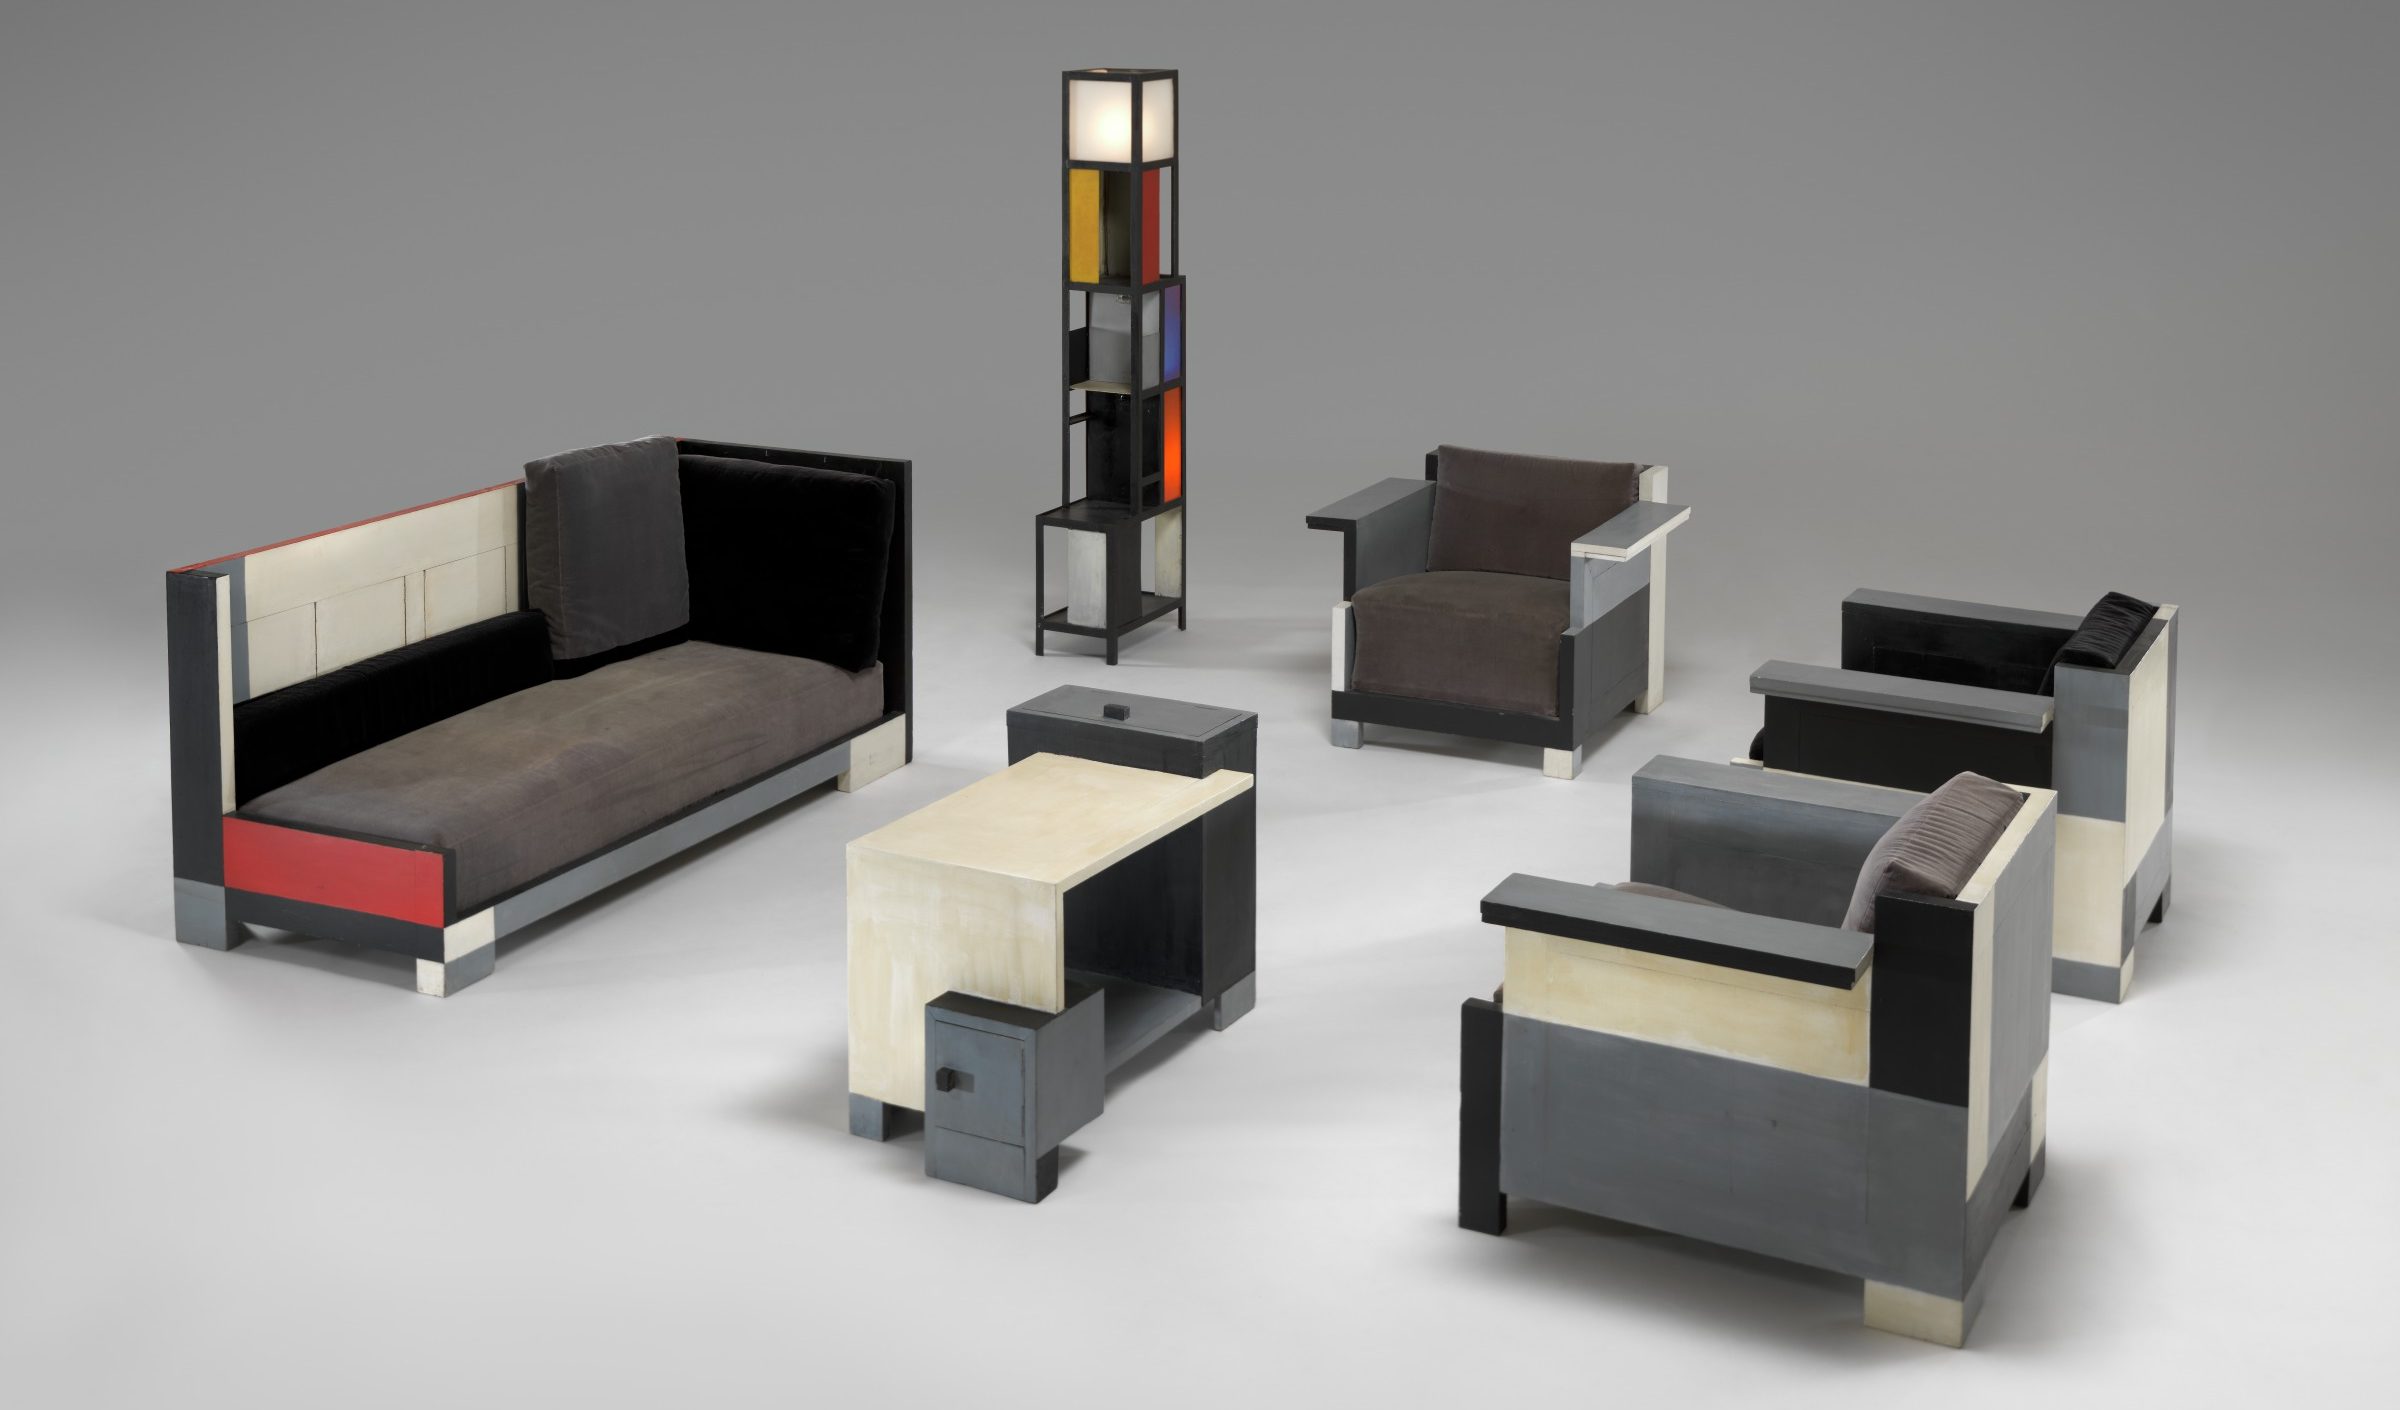
Félix Del Marle, French, 1889–1952, Suite of Furniture, 1926, Painted wood, frosted glass, metallic paint, painted metal,Gift of Sydney and Frances Lewis, 85.101.1-6
The second furniture suite was made by another French artist named Félix del Marle. This suite, which del Marle made for his own house, was inspired by a later art movement called De Stijl, which just means “the style” in Dutch. The artists, designers, and architects of this movement preferred to use primary colors, straight lines, rectangles, and squares in their creations.
Visit the VMFA Collections Search or click on the images to examine these suites more closely.
You may also explore more decorative designs by choosing “Decorative Arts after 1890” in the drop-down menu.
Let’s Construct More Art Together!
For this project, your challenge is to construct a suite of furniture inspired by your explorations of the Decorative Arts furniture in the collections of the Virginia Museum of Fine Arts. This is a great opportunity to work with a small group, sharing your ideas and discoveries, to create a room.
You’ll need:
- an assortment of colored construction paper
- ruler
- pencil
- scissors
- glue sticks, bottled glue, tacky glue
- assorted decorative materials
- colored tape
- an assortment of containers
What’s in your closet, drawer, or cupboard?
Ask your parents or teacher to help you locate safe objects for this project! You might use cardboard or pasteboard boxes, paper, magazines, etc.
Investigate your materials. Think about construction.
How were the boxes put together?
What shape do you want to make? Is there a box or container that might work? Remember to keep to the same scale for your furniture.
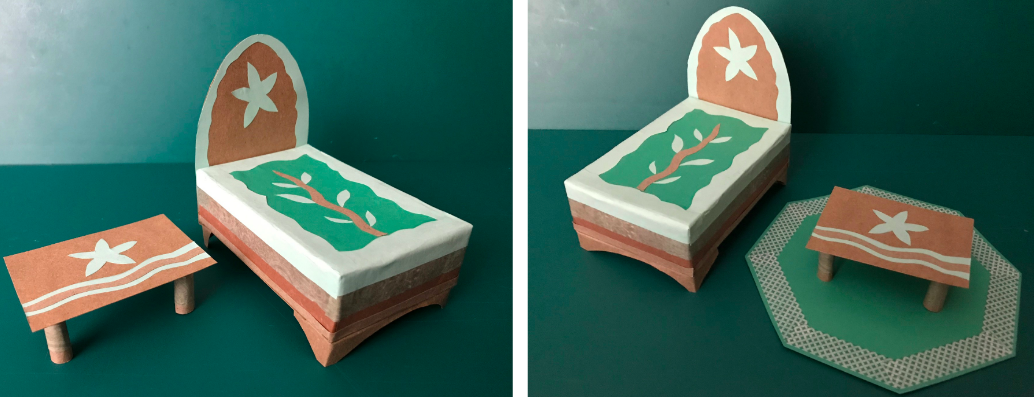
Here’s an example of two pieces of furniture inspired by the natural world. A small cardboard rectangular box was used for the body of the bed. Colored construction paper, salvaged note cards, and leftover Washi tape added decorative elements.
What will your team build as you explore design and construction?
Check out these resources on structure created by PBS Learning Media.
The video Columns: Finding the Strongest Shape is particularly appropriate for designing furniture!
Catching the Viewer’s Eye?
Many contemporary artists use non-traditional materials in their work—and they often use their work to raise questions about social issues. Let’s consider one artist from America and one from Ethiopia.
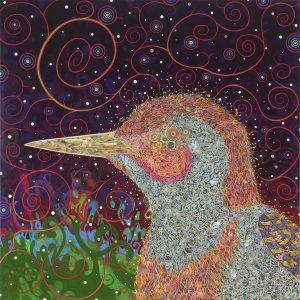
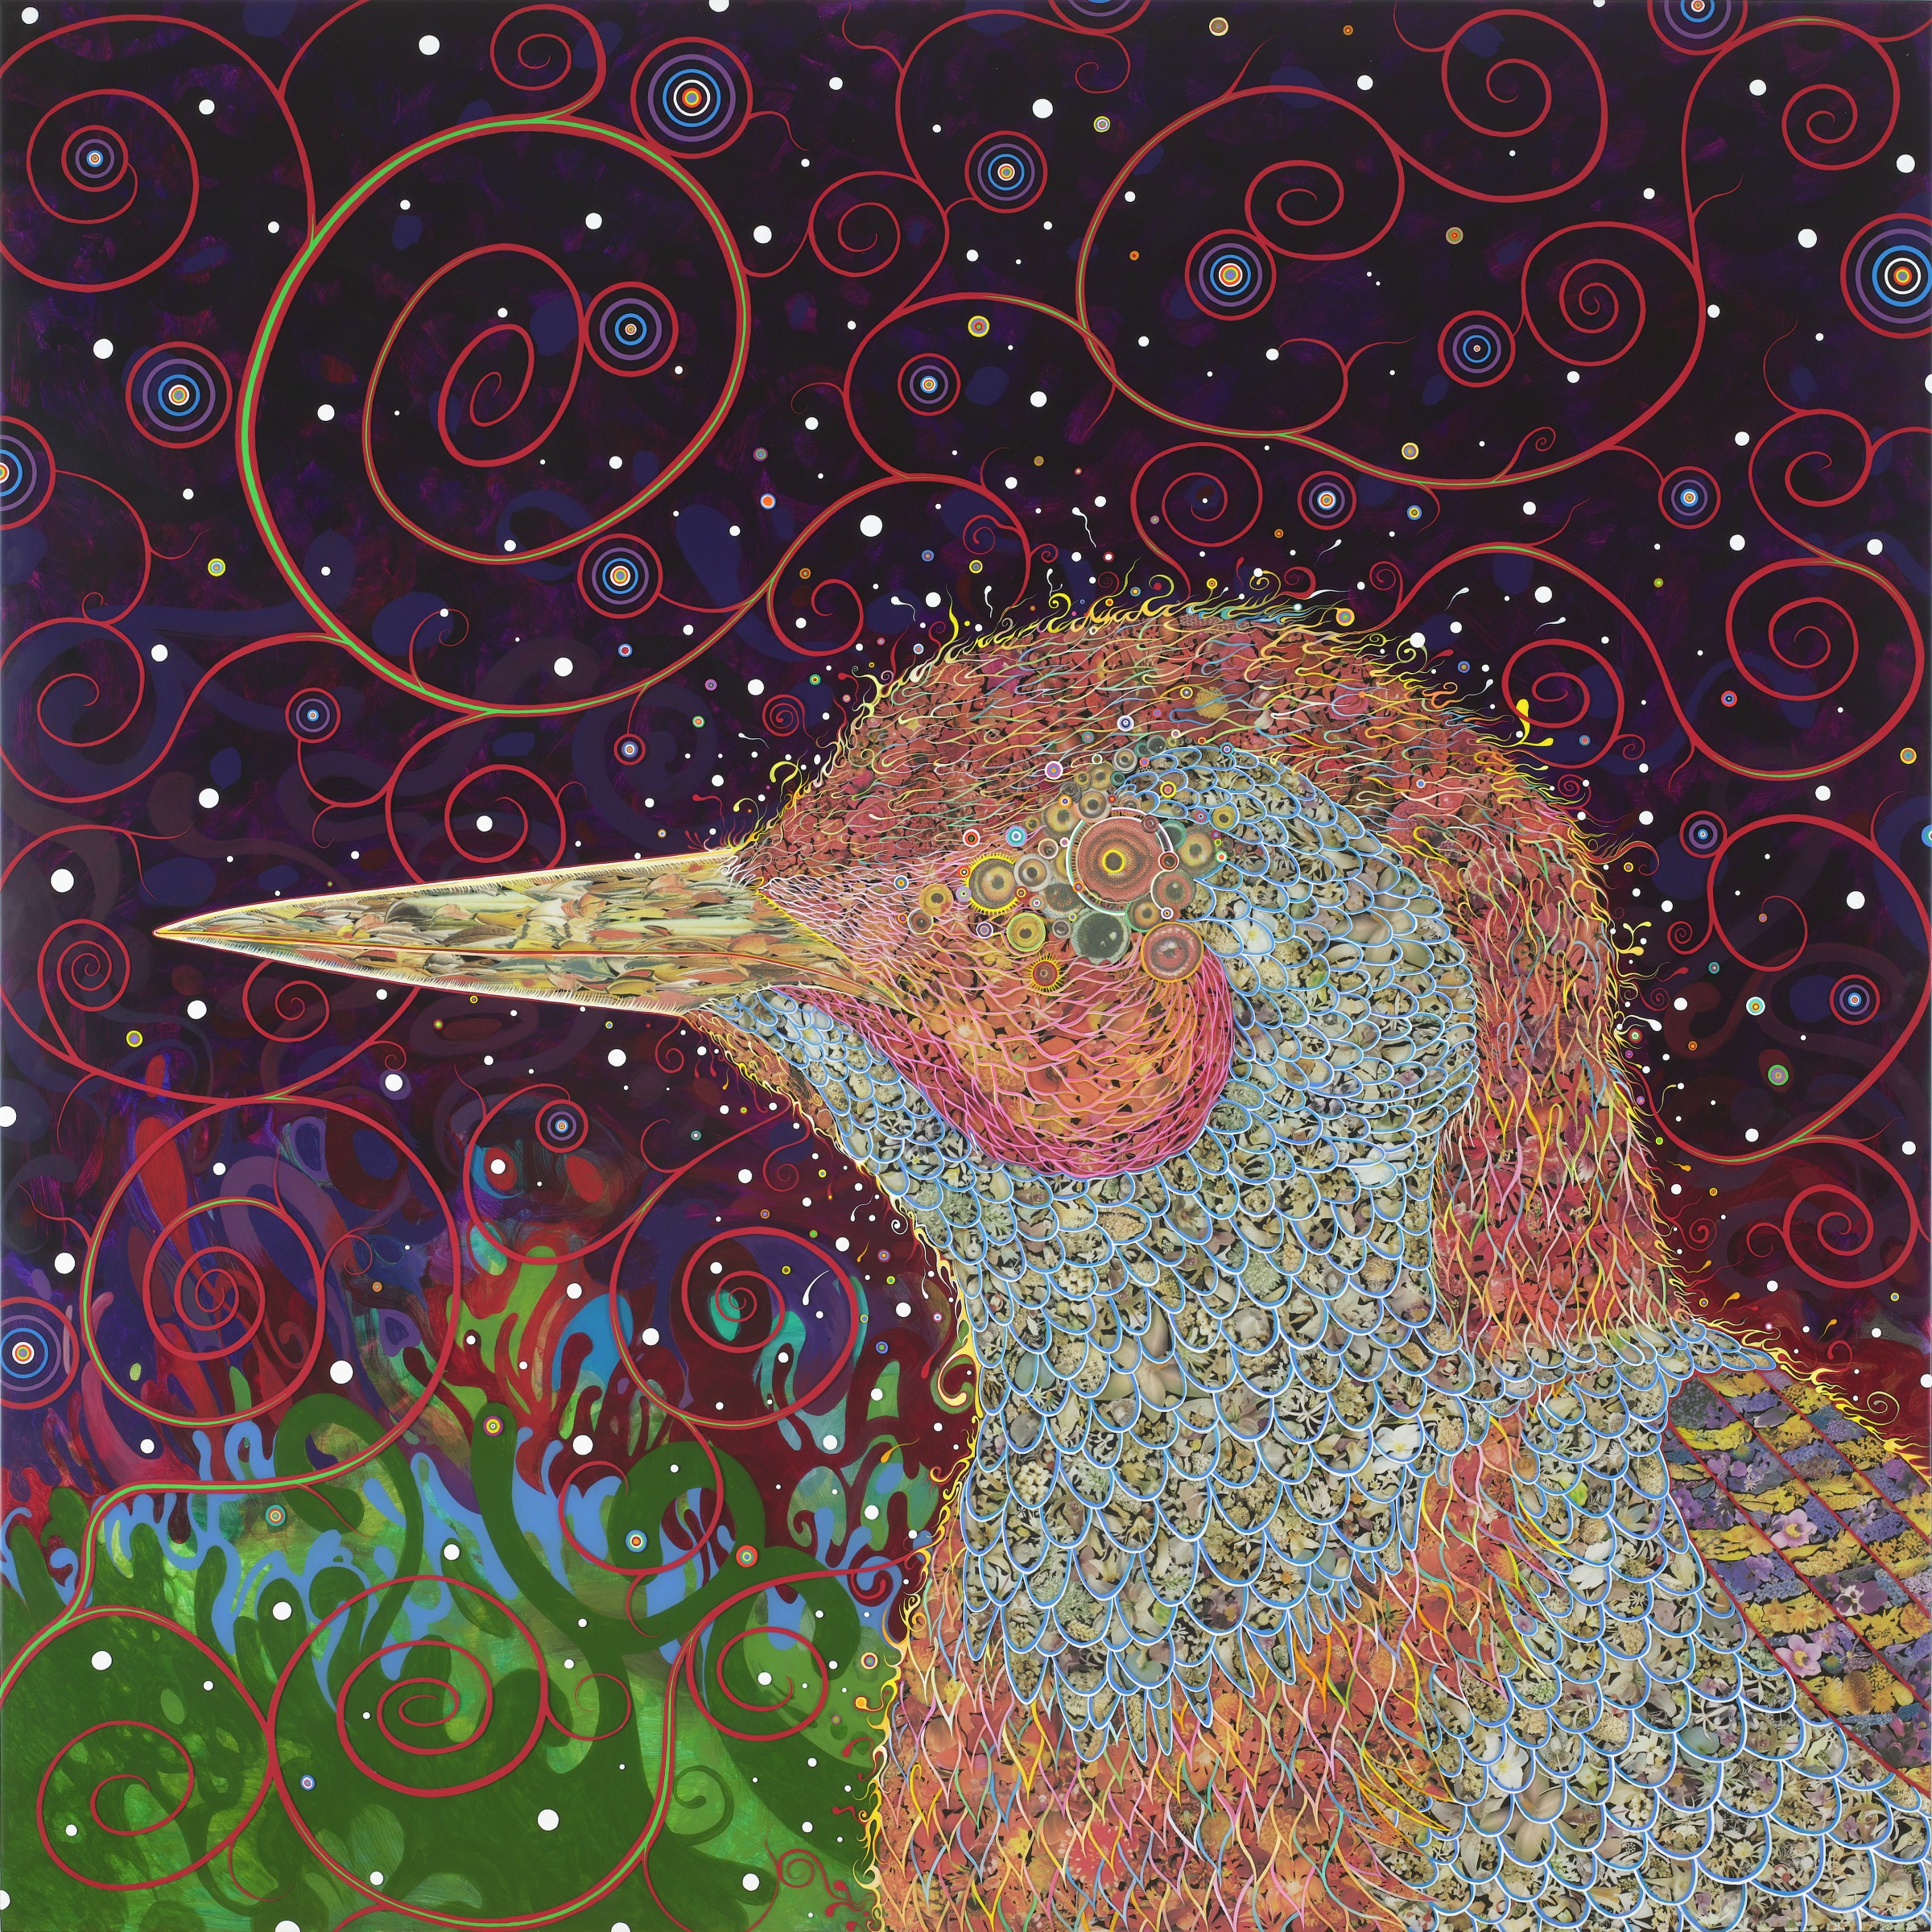
Tomaselli creates layered, collaged images with vibrant colors and textures. He often explores the human impact on the natural environment in his work.
The materials in this collage include acrylic paint and gouache. Gouache is a paint similar to watercolor, but with a thickener added that makes the paint opaque—not translucent like water color. Much of the background color is created with these paints, but the bird’s body and beak are collaged from magazine and published picture clippings. The beak is completely made of tiny pictures of bird beaks. The bird’s feathered body is made with tiny pictures of flowers. After he finishes painting and collaging the image on a wood panel, Tomaselli adds a layer of resin, which gives the surface a glossy finish.
This large work was designed by the Ethiopian artist Elias Sime. To make the 50 sections that are perfectly matched up to make patches and swirls of color, Sime used reclaimed electronic parts, including gears and plastic-coated wires in multiple colors.
He finds many of the materials he uses in his work in the Mercato, a giant open-air market in Addis Ababa, the capital of Ethiopia. One section of this market is known as the Menalesh Tera which means “what do you have?” In this area, reclaimed trash from all over the world—from buttons and bottle caps, to circuits, keyboards, and wires—is offered for sale. When Sime collects these materials for his work, he explains that he thinks of the stories behind the materials—about how they were used by many people in many places. He emphasizes that his works of art express his feelings about the ways in which we are all connected and part of the same world. He also considers how technology has changed the ways in which humans communicate with one another, wondering if something is being lost in virtual communication.
“When you don’t talk while looking eye to eye, how do you know one another? Or have a conversation? . . . . I am not in opposition to technology. It’s about how to balance it with “real” life. We’ve become off-balance. My title for my series of collages, Tightrope, has a double meaning. It’s about this equilibrium, but I also wanted it to evoke a string: if you pull it too tight, it will break.”
Continuous Rotation Servos, which supplied the gears in this work, allow one machine to guide the actions of another machine, and wires, of course, carry the electricity that makes many devices work. Do you think that Sime was thinking about the ways these parts were used as he designed this work?
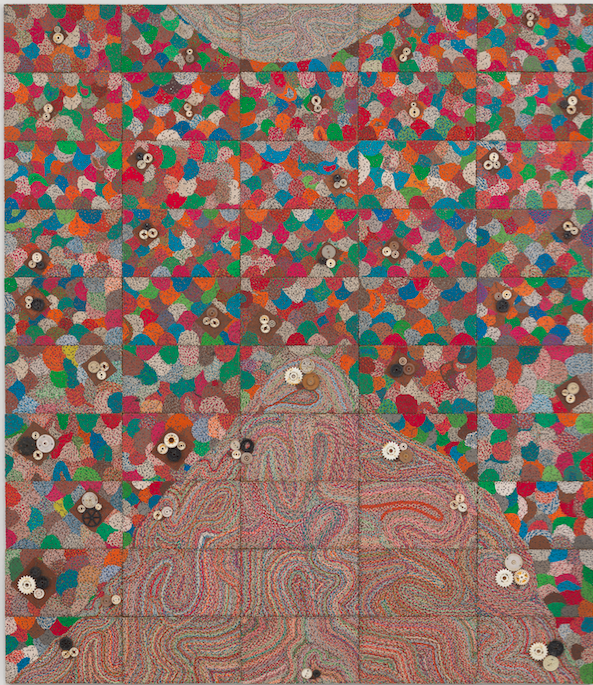
Elias Sime, Ethiopian, born 1968, Tightrope: Continuous Rotation Servos, 2017, Reclaimed electronic components and wire on panel, Arthur and Margaret Glasgow Endowment, 2018.3
Sources: Quote from The Spectator, Elias Sime, Wellin-featured artist, is honored at Smithsonian’s 2019 African Art Awards, by Karina Bayrakdarian, Nov. 7, 2019.
Wellin Museum of Art offers this video of Sime talking about his work and process: Elias Sime: Tightrope
What Inspires You? An Open Challenge
Did these works by Tomaselli and Sime help you to think more deeply about your own work and process?
Continue your exploration of building and construction by using found or reclaimed objects to assemble a work of art that relates to an idea or concern that is personally important to you. Take time to develop your ideas and consider how they might relate to the colors, textures, and forms you decide to use in your found-object sculpture.
When you finish creating your sculpture, write an artist statement explaining your thoughts and decisions as you constructed your sculpture.
This VMFA Art-Making Adventure relates to the following Virginia SOLs:
2020 Visual Arts Standards: K.1, k.6b, K.9, K.12, K.16, 1.1, 1.2a, 1.3, 1.8, 1.12, 1.15, 1.16, 2.1a, 2.2, 2.4, 2.6ac, 2.12, 2.15, 2.16, 3.1, 3.2, 3.6, 3.12, 3.15, 3.17, 4.1, 4.2, 4.4, 4.6abc, 4.12, 4.17, 5.1, 5.3c, 5.6c, 5.12, 5.15, 5.16b, 5.17
2013 Visual Arts standards: K.3, K.5, K.7, K.8, K.9, K.11, K.13, 1.1, 1.5, 1.7, 1.12, 2.1, 2.4, 2.5, 2.10, 3.1, 3.4, 3.5, 3.6, 3.7, 3.11, 3.15, 3.23, 4.1, 4.2, 4.4, 4.5, 4.7, 4.11, 4.18, 4.19, 5.1, 5.2, 5.3, 5.5, 5.10, 5.11, 5.18
2016 Mathematics standards: K10, 1.11, 2.8a, 2.13, 4.11
2017 English standards (artist statements in final activity): 3.8, 4.7, 5.7